Investing in a high-quality ergonomic office chair is only the first step toward a pain-free workday. The real magic happens when you calibrate that piece of hardware to your specific body. Unfortunately, most people sit down, pull a single lever to stop their feet from dangling, and ignore the rest of the confusing knobs and dials beneath the seat.
When a chair is not properly tuned to your geometry, it actually works against you. An overly tense backrest will push you into a slouch, while armrests that are too high will cause chronic shoulder tension.
By systematically adjusting chair height, tilt, and depth, you can transform a generic seat into a custom-fitted support system. This guide will decode the levers on your chair and walk you through the exact sequence of adjustments needed to achieve maximum comfort.
The Core Mechanism: Finding Your Base
Adjusting chair height means setting the pneumatic gas cylinder so your feet rest flat on the floor with your knees bent at a 90-degree angle. This foundational adjustment aligns your pelvis, stabilizes your spine, and allows the chair to bear your body weight evenly.
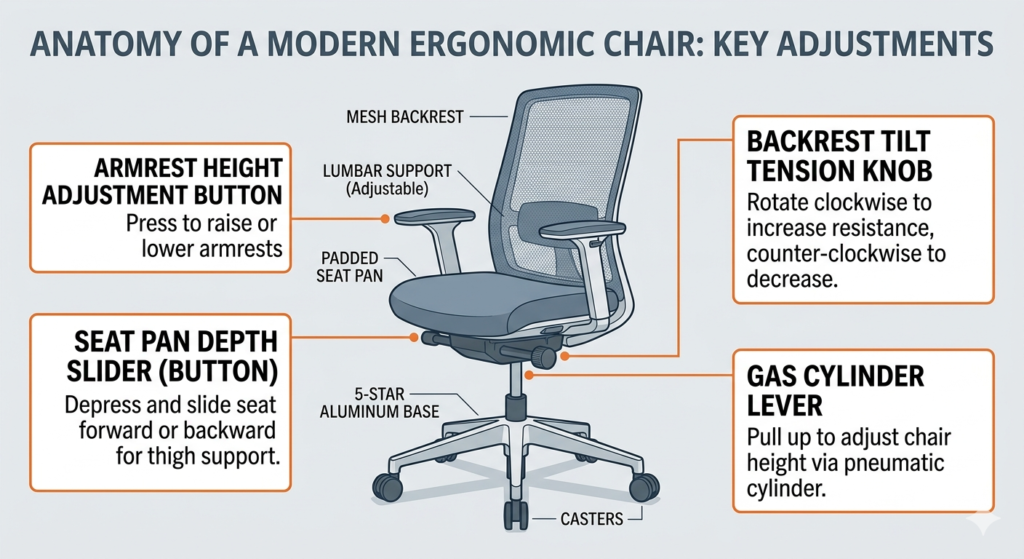
The mechanism that controls this up-and-down movement is the gas cylinder, typically operated by a paddle lever on the right side of the chair. To set it perfectly, stand in front of your chair and adjust the height until the highest point of the seat cushion is just below your kneecap. When you sit down, your feet should be firmly planted, providing a stable base for your upper body.
Over time, gas cylinders can lose pressure, causing the chair to slowly sink throughout the day. Rather than throwing away an expensive ergonomic chair, you can easily restore its function by swapping out the failing cylinder with high-quality replacement hardware.
Dialing in the Seat Pan Depth
Once your feet are planted, you must address the horizontal support for your legs. This is controlled by the seat pan depth adjustment, usually a lever or button located under the front edge or side of the seat cushion that allows the seat to slide forward and backward.
If the seat pan is too deep, the front edge will press into the back of your calves, restricting blood flow and causing swelling in your lower legs. If it is too shallow, your thighs will lack support, placing excessive pressure on your sitting bones.
Slide the seat pan until you can comfortably fit two to three fingers between the front edge of the cushion and the back of your knees while your lower back is firmly pressed against the backrest. This ensures optimal weight distribution across your thighs.
Mastering Backrest Tension and Tilt
The most misunderstood control on an office chair is the backrest tension knob. This is typically a large, thick dial located directly under the center of the seat.
This knob controls how much resistance the backrest provides when you lean back.
- Too tight: You will have to force yourself backward, which is exhausting for your core.
- Too loose: You will feel like you are falling backward the moment you relax, offering zero spinal support.
Turn the dial to match your body weight. You want to be able to recline slightly with minimal effort, but still feel the chair pushing back gently to support your spine. This dynamic movement allows you to easily maintain the foundational alignments discussed in our pillar guide, Neutral Posture Explained: The Science of the 90-90-90 Rule, without feeling locked into a rigid, static position.
Setting Proper Armrest Height
The final step in your calibration process is setting the armrest height. Armrests are designed to take the weight of your arms off your neck and shoulders, but if set incorrectly, they cause more harm than good.
Drop the armrests all the way down. Relax your shoulders completely, allowing your arms to hang by your sides, and bend your elbows to a 90-degree angle. Now, raise the armrests until they just make contact with the underside of your forearms.
Do not push them so high that your shoulders are shoved upward toward your ears. Your arms should rest lightly on the pads, allowing your neck muscles to completely disengage while you type.
Conclusion
A high-end ergonomic chair is practically useless if you do not know how to operate its mechanics. By methodically adjusting chair height, setting the correct seat pan depth, balancing the backrest tension, and aligning your armrests, you create a workspace that actively supports your body. Taking five minutes to properly calibrate your chair will drastically reduce daily fatigue and protect your spine against the cumulative stress of desk work.
Frequently Asked Questions (FAQ)
Why does my office chair keep sinking?
A sinking office chair is caused by a worn-out pneumatic gas cylinder. The seals inside the cylinder degrade over time, allowing the pressurized gas to escape. The cylinder is a standard, replaceable part on almost all office chairs.
Should my chair be higher or lower than my desk?
Your chair height should be dictated by your body (feet flat, knees at 90 degrees), not your desk. If setting your chair to the correct height for your body makes your desk too high to reach comfortably, you should use a keyboard tray to lower the typing surface or a footrest to elevate your feet.
What is a synchronous tilt mechanism?
A synchronous tilt (or synchro-tilt) mechanism is a feature on high-end chairs where the backrest reclines at a faster rate than the seat pan (usually a 2:1 ratio). This allows you to lean back while keeping your feet flat on the floor and preventing the front edge of the seat from lifting your thighs.
Should my armrests be level with my desk?
Ideally, yes. Your armrests should be level with your keyboard/desk surface so your forearms can glide smoothly from the armrest to the keyboard without bending your wrists upward or downward.