Starting the workday full of energy but ending it feeling completely drained is a common experience for desk workers. This exhaustion is rarely just mental; it is often the physical toll of holding your body in unnatural, unsupported positions for eight hours a day. When you slouch or lean, your muscles must work constantly against gravity just to keep you upright.
Learning how to sit correctly is a foundational habit that can transform your daily energy levels. By treating your posture as a mechanical checklist rather than an afterthought, you can eliminate the micro-strains that accumulate into deep fatigue by the afternoon.
This step-by-step tutorial is designed to be your morning routine. Before you check your first email, run through this sequence to align your body for maximum comfort and endurance.

The Foundation of Good Posture
Knowing how to sit correctly means aligning your ears, shoulders, and hips vertically while keeping your feet flat on the floor. It involves maintaining a neutral spine with proper pelvic tilt, ensuring your joints are stacked to minimize muscular fatigue and joint stress throughout the workday.
Step 1: Establish Your Base with Feet Flat
Posture begins from the ground up. If your lower body is unstable, your upper body will instinctively tense up to maintain balance.
- Plant Your Feet: Keep both feet flat on the floor or on a stable footrest. Avoid crossing your legs or tucking your feet under the chair’s casters, as this restricts blood flow and misaligns your hips.
- Set Your Angles: Your knees should be bent at roughly a 90-degree angle. This foundational concept of joint alignment is explored deeply in our guide, Neutral Posture Explained: The Science of the 90-90-90 Rule.
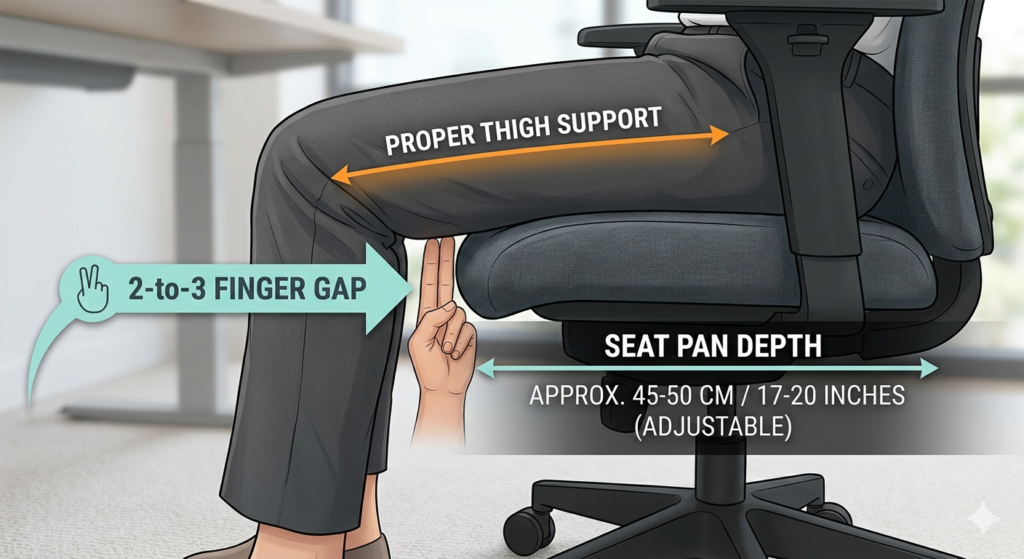
Step 2: Ensure Proper Thigh Support
The seat pan (the part of the chair you sit on) plays a critical role in distributing your body weight.
- Maximize Surface Area: Sit far enough back in the chair so that your thighs are fully supported by the seat cushion. This even distribution of weight prevents pressure points on your sitting bones (ischial tuberosities).
- Check the Gap: You should have about two to three fingers of space between the back of your knees and the front edge of the seat pan. If the seat is too deep, it will press into your calves and impede circulation, causing your legs to fall asleep or feel heavy.
Step 3: Master the Pelvic Tilt
Your pelvis is the steering wheel for your spine. The direction your pelvis tilts dictates the curvature of your entire back.
- Avoid the Slouch: When you slump forward, your pelvis rolls backward (posterior pelvic tilt). This flattens the natural curve of your lower back, placing immense pressure on your spinal discs.
- Find Neutral: Sit all the way back so your buttocks touch the base of the backrest. Allow the chair’s built-in support to push gently into your lower back, encouraging a slight forward rotation (anterior tilt) that preserves your natural lumbar curve.
- Fill the Gap: If your chair is completely flat or too large for your frame, it cannot support this curve. Adding a contoured cushion to fill the gap between your lower back and the chair backrest is a highly effective way to maintain this posture passively.
Step 4: Practice Shoulder Relaxation
Upper body fatigue is almost always caused by elevated shoulders. This happens when armrests are too high or your desk surface forces you to reach upward to type.
- Drop Your Shoulders: Consciously pull your shoulders down and away from your ears. Shoulder relaxation is critical for preventing tension headaches and neck stiffness.
- Position Your Arms: Let your upper arms hang loosely by your sides. Bend your elbows to 90 degrees. Your forearms should rest parallel to the floor, seamlessly meeting the keyboard without requiring you to lift your shoulders.
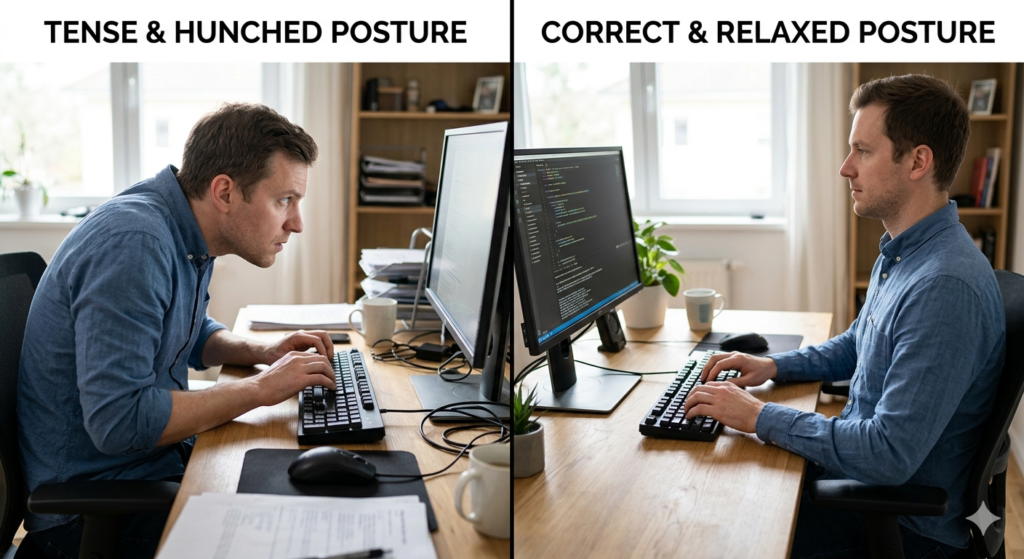
Step 5: Align the Head and Neck
The human head weighs approximately 10 to 12 pounds. When balanced perfectly over the shoulders, it feels weightless. For every inch your head moves forward toward your screen, the load on your neck muscles effectively doubles.
- The Chin Tuck: Instead of tilting your chin up to see the monitor, perform a subtle chin tuck. Pull your head straight back horizontally, as if making a double chin.
- Ear Alignment: Ensure your earlobes are vertically aligned with the center of your shoulders.
Conclusion
Good ergonomics is not about sitting rigidly like a statue; it is about establishing a mechanically sound baseline that your body can easily return to. By following this step-by-step checklist every morning, you take the guesswork out of your physical alignment. Remembering exactly how to sit correctly—from keeping your feet flat to mastering pelvic tilt—is the single most effective way to eliminate afternoon fatigue and protect your musculoskeletal health for years to come.
Frequently Asked Questions (FAQ)
Is it better to sit all the way back or on the edge of the chair?
It is always better to sit all the way back in your chair. Sitting on the edge of your seat forces your core and back muscles to work constantly to keep you upright, leading to rapid fatigue. Sitting back allows the chair to bear your weight.
Why does my back hurt even when I sit up straight?
“Sitting up straight” often causes people to over-arch their backs, pushing their chest out militarily. This creates an extreme anterior pelvic tilt, which tires out the back muscles just as quickly as slouching. The goal is a relaxed, neutral spine, not a rigid one.
Does crossing my legs cause fatigue?
Yes. Crossing your legs misaligns your pelvis, which in turn misaligns your spine. This uneven distribution of weight forces the muscles on one side of your back to work harder than the other, leading to asymmetrical fatigue and discomfort.
How often should I check my posture while sitting?
It is helpful to mentally run through this posture checklist every 30 to 60 minutes. Setting a small timer or tying the habit to a routine action (like drinking water or finishing an email) can help you reset your body before fatigue sets in.