Most desk workers accept wrist fatigue and stiffness as a normal part of the digital age. However, typing should never cause physical pain. If your joints ache or burn after a long session of drafting emails, the issue lies in the biomechanics of your finger movements and the alignment of your arms.
When your hands are positioned incorrectly, every keystroke creates microscopic friction within the soft tissues of your forearm. This comprehensive typing posture tutorial breaks down the exact physical alignment required to glide across your keyboard effortlessly. We will explore how to maintain neutral positioning, the hidden dangers of standard keyboard angles, and why adopting a floating technique is essential for pain-free productivity.

What is Proper Typing Posture?
Proper typing posture is the biomechanical alignment where your forearms, wrists, and hands form a straight, horizontal line over the keyboard. This neutral position ensures that the tendons controlling your fingers glide smoothly without scraping against the surrounding carpal tunnel tissues.
When you bend your wrists backward to reach the keys, you force these tendons to pull at a sharp angle. Over thousands of daily keystrokes, this mechanical friction causes severe inflammation. Maintaining neutral hands is the absolute baseline for preventing repetitive strain injuries at the desk.
The Mastery of Floating Wrists
The most common typing mistake is resting the heel of the palm or the wrist joint directly on the desk surface or a hard wrist rest while typing. This anchors the hand firmly in place.
To reach keys that are further away from this anchor point, you are forced to splay your fingers awkwardly and twist your wrists side-to-side. This lateral bending (ulnar and radial deviation) is highly destructive to the delicate ligaments in the wrist.
To prevent this twisting, you must adopt the technique of floating wrists.
- Hover your hands roughly half an inch above the keyboard.
- When reaching for a distant key (like “Backspace” or “Enter”), do not stretch your pinky finger.
- Instead, move your entire arm from the shoulder, keeping the wrist perfectly straight.
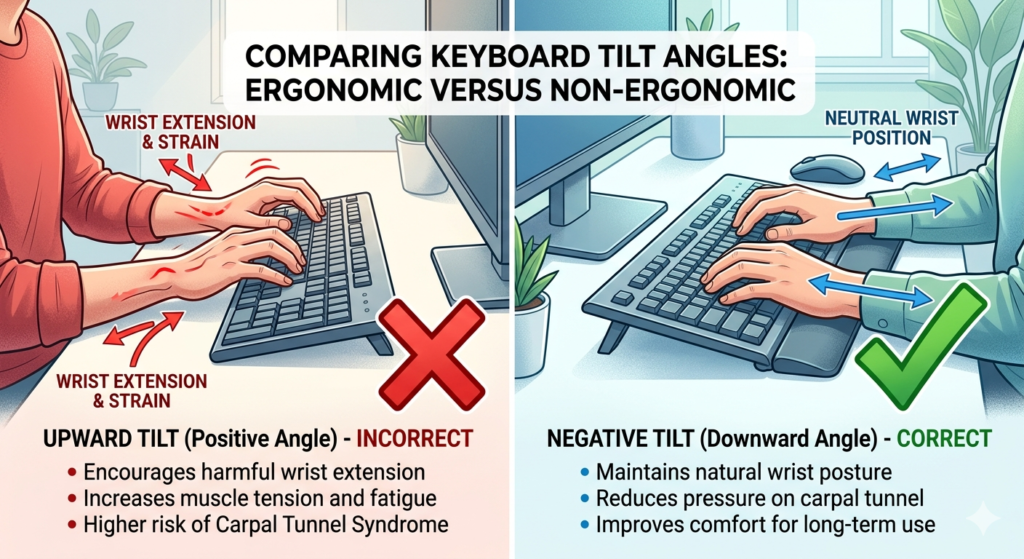
Correcting Keyboard Tilt and Angle
Almost every standard keyboard features small plastic feet at the back. Most users instinctively flip these up, assuming the upward keyboard tilt makes typing easier or more ergonomic.
Biomechanically, this is the worst adjustment you can make. An upward tilt forces your hands into extension (bending backward toward the top of your forearm). Your keyboard should actually be perfectly flat on the desk. If you have an adjustable tray, tilting the keyboard slightly downward away from you (negative tilt) is even better, as it perfectly aligns with the natural downward slope of your resting arms.
Furthermore, a standard, straight keyboard forces your wrists to bend outward to keep your fingers on the horizontal rows. Upgrading to a peripheral that physically splits the keys down the middle allows you to keep your hands aligned with your natural shoulder width, entirely eliminating the awkward outward twist.
As detailed in our broader lifestyle guide, Workspace Wellness: Building a Routine for Longevity, optimizing these daily physical interactions with your hardware is a non-negotiable step in building a sustainable career.
The Biomechanical Value of Touch Typing
The mechanics of finger movement are vastly improved when you memorize the keyboard layout. “Hunt and peck” typing requires constant visual shifting and erratic, unpredictable hand placement.
Learning touch typing allows you to anchor your fingers lightly on the home row keys (ASDF and JKL;). Because your hands hover in a consistent, central location, muscle memory takes over. This drastically reduces the physical distance your fingers must travel. Shorter travel distances mean less muscular exertion, faster typing speeds, and a significant reduction in the erratic wrist twisting that leads to tendonitis.
Conclusion
Your hands are the primary tools of your trade, and protecting them requires conscious mechanical adjustments to how you interact with your hardware. By following this typing posture tutorial, you can eliminate the daily friction that causes repetitive strain. Focus on maintaining floating wrists, lay your keyboard completely flat to avoid backward extension, and practice touch typing to minimize unnecessary joint movement. Implementing these micro-habits today will ensure your hands remain agile and pain-free for decades.
Frequently Asked Questions (FAQ)
Should my wrists touch the desk while typing?
No. While actively typing, your wrists should float slightly above the desk or keyboard tray. You should only rest the heel of your palms on a wrist rest during pauses when you are not pressing keys.
Why do my wrists hurt when I type on a laptop?
Laptops force your hands into a highly compressed space. The built-in keyboard often requires you to bend your wrists outward to fit your hands together, and the trackpad placement encourages resting your wrists on the hard metal edge, both of which cause rapid strain.
What is a negative keyboard tilt?
A negative keyboard tilt means the front edge of the keyboard (closest to you) is higher than the back edge. This slopes the keys downward, away from your body, which perfectly accommodates the natural downward angle of your forearms when sitting at a proper height.
How long does it take to learn touch typing?
With consistent daily practice of 15 to 30 minutes using free online typing tutors, most people can memorize the home row and comfortably touch type without looking at the keys within 2 to 4 weeks.